AP102 2016/4/25
MVC
Model是指與view完全無關的
controller介於model與view之間的仲介者
controller與view溝通的功能就稱為IBoutlet
而view要與controller溝通時必須要有action target要找到目標controller
設計模式
delegate
model與controller溝通
KVO
Notification
設計模式
觀察者obervation
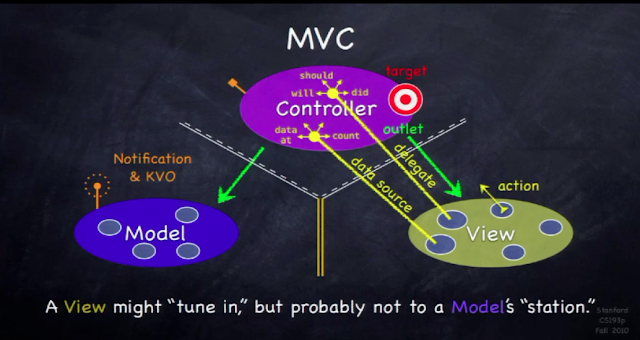
Controller 是指揮,當他需要資料時呼叫 Model,必須從Model獲取數據;
Model是指與view完全無關的
controller介於model與view之間的仲介者
controller與view溝通的功能就稱為IBoutlet
而view要與controller溝通時必須要有action target要找到目標controller
設計模式
delegate
model與controller溝通
KVO
Notification
設計模式
觀察者obervation

Controller 是指揮,當他需要資料時呼叫 Model,必須從Model獲取數據;
當需要 UI view或更新的時呼叫 View,創造 UI 顯示數據。
Controller 可以直接與 Model 和 View溝通,對於 nib (xib 或 storyboard)方式創建view,使用 outlet 来與 View聯繫。
- Model 可不可以跟 Controller 聯繫?
一種是Model資料改變,需要通知 Controller,UI 需要 update 了。
可以,通過廣播 radio 機制,也就是圖片中的 Notification & KVO。
iOS 中有一个 NotificationCenter,Model 在這裡登錄一個radio,它可以選擇自己在何時執行這個廣播,廣播中帶有資料。
Controller 中要登錄一个 Observer,也就是一個audience,隨時關注 Model 廣播,當收聽到到 Model 發送的廣播後,可以接收消息,也可以做出對應的動作。
當然,除了 KVO,也可以直接把 Model 的某些操作放在 Controller 中做,這樣就不需要這麼複雜,但會破壞 MVC 分工的模式,破壞其獨立性。
- View 可不可以向 Controller 發送消息呢?
可以,對於 nib 是用 IBAction,對於 code 是用 addTarget,這個消息是當某某事件發生的時候告诉 Contoller 你可以做出某些對應的動作。
還有一種場景對於某些 View,一般會有一些對應的操作,iOS 自動提供了這樣的消息,允许重構其方法。比方說對於 table view 就有didSelectRowAtIndexPath,可以實現方法,當使用者選擇某一個 cell 的时候,就會掉用這個裡面定義的一些操作,這個定義就是在 Controller 中實作的。这就是圖片中的 delegate,也是一種設計模式,其方法前面通常有 will, should, did。對於 delegate 以後再介紹。
還有一種情況:當 UI 需要數據的时候?比如 table view 中的 cell 就是用来展示數據的,table view 應該放幾個 cell,每個 cell裡面是什麼?從图中可以看到,一般嚴格禁止 Model 和 View 之間的聯繫,因为希望 data 和 representation 是各自獨立的,所以不能直接跟 Model 要資料。iOS 提供了 datasource 這種一致来讓 View 向 Controller 要數據。
-----------------------------------------
專案練習
IOS有一種橡皮筋式的自動排版
autolayout

另外針對下方的頁面也有提供是否針對iphone與ipad的佈局調整


一個button也能做很多對應的動作去呼叫controller

UI元件要確認位置跟尺寸
第一步先開啟一個專案
範例程式碼

先至下方搜尋

search 的地方先搜尋Label 會出現這樣的圖案

對Label桉住左鍵
然後拖曳到main.storyboard
然後右方可以更改標籤名稱
點擊Text 下方可以更改Label的名稱

更改完以後
開始進行排版

右下角有四個圖案
先點擊

add new alignment constraints
然後勾選Horizontally in Container
接著
Add 1 Constraint 記得這裡是增加
如果要修改不能直接再重複這個動作
而是要先點選Label
然後再點最右邊的
然後選Clear Constraints
做為消除這些排板的工具
不可再點選add 來調整

接著點擊Add New Constraints
上面的數字輸入20 點選下方的紅框
會變成紅色
此時後再按Add 1 Constraint


接著按下標籤後
再去點選最右邊的這個圖示
然後點選update frames即可更新畫面
同樣的動作做三次
但要注意
第二次做的時候
要先手動將Label拉到較為中間的地方
然後在第一個Label的下方
這樣子在做對齊時才不會跑掉
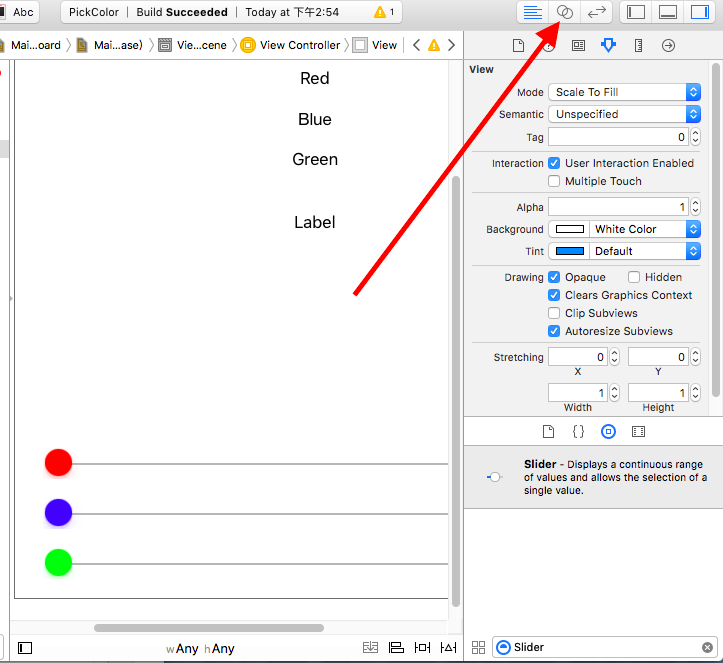
然後同樣再到xcode裡面進行搜尋slider
然後同樣拖曳到main.storyboard
這個Slider的bar
先在左方value設定 minimun最小值是0
最大值設定為 255(因為RGB最大值是255)
current值則是目前畫面顯示的值
因為設為0 所以在最左方

然後
Min track tint 在這個圓圈左邊顯示的顏色
Max track tint 在這個圓圈右邊顯示的顏色
thumb tint 圈圈顯示的顏色
接著同樣跟Label一樣
右下角有四個圖案
先點擊
add new alignment constraints
然後勾選Horizontally in Container
接著
Add 1 Constraint 記得這裡是增加
如果要修改不能直接再重複這個動作
接著點擊Add New Constraints
下面的數字輸入20 左方與右方的數字輸入10
會變成紅色
要注意現在紅色的 類似工 這個字的紅色是虛線
一定要變成紅色實線才代表有點到
此時後再按Add 3 Constraint 就完成了
接著按下標籤後
再去點選最右邊的這個圖示
然後點選update frames即可更新畫面
重複做三次以後
接著排板完成以後開始寫程式碼

先進行IBOUTLET 點擊Slider
以後按著滑鼠右鍵
拖曳到ViewController.m裡面寫程式碼


完成以後開始寫內部的動作
//改變背景顏色的方法
完成以後就可以按下輸出了
特別備註:要更改IBOUTLET裡面的label變數不可以直接改
要先點擊右方 click1然後再按click2取消這個Label與controller的關係
然後再重新拉一次才會鍵結view與controller的關係。

還有一種場景對於某些 View,一般會有一些對應的操作,iOS 自動提供了這樣的消息,允许重構其方法。比方說對於 table view 就有didSelectRowAtIndexPath,可以實現方法,當使用者選擇某一個 cell 的时候,就會掉用這個裡面定義的一些操作,這個定義就是在 Controller 中實作的。这就是圖片中的 delegate,也是一種設計模式,其方法前面通常有 will, should, did。對於 delegate 以後再介紹。
還有一種情況:當 UI 需要數據的时候?比如 table view 中的 cell 就是用来展示數據的,table view 應該放幾個 cell,每個 cell裡面是什麼?從图中可以看到,一般嚴格禁止 Model 和 View 之間的聯繫,因为希望 data 和 representation 是各自獨立的,所以不能直接跟 Model 要資料。iOS 提供了 datasource 這種一致来讓 View 向 Controller 要數據。
-----------------------------------------
專案練習
IOS有一種橡皮筋式的自動排版
autolayout

另外針對下方的頁面也有提供是否針對iphone與ipad的佈局調整


一個button也能做很多對應的動作去呼叫controller

UI元件要確認位置跟尺寸
第一步先開啟一個專案
範例程式碼

先至下方搜尋

search 的地方先搜尋Label 會出現這樣的圖案

對Label桉住左鍵
然後拖曳到main.storyboard
然後右方可以更改標籤名稱
點擊Text 下方可以更改Label的名稱
更改完以後
開始進行排版

右下角有四個圖案
先點擊

add new alignment constraints
然後勾選Horizontally in Container
接著

Add 1 Constraint 記得這裡是增加
如果要修改不能直接再重複這個動作
而是要先點選Label
然後再點最右邊的

然後選Clear Constraints
做為消除這些排板的工具
不可再點選add 來調整

接著點擊Add New Constraints
上面的數字輸入20 點選下方的紅框
會變成紅色
此時後再按Add 1 Constraint


接著按下標籤後
再去點選最右邊的這個圖示
然後點選update frames即可更新畫面
同樣的動作做三次
但要注意
第二次做的時候
要先手動將Label拉到較為中間的地方
然後在第一個Label的下方
這樣子在做對齊時才不會跑掉
然後同樣再到xcode裡面進行搜尋slider
然後同樣拖曳到main.storyboard
這個Slider的bar
先在左方value設定 minimun最小值是0
最大值設定為 255(因為RGB最大值是255)
current值則是目前畫面顯示的值
因為設為0 所以在最左方

然後
Min track tint 在這個圓圈左邊顯示的顏色
Max track tint 在這個圓圈右邊顯示的顏色
thumb tint 圈圈顯示的顏色
接著同樣跟Label一樣
右下角有四個圖案
先點擊
add new alignment constraints
然後勾選Horizontally in Container
接著
Add 1 Constraint 記得這裡是增加
如果要修改不能直接再重複這個動作
接著點擊Add New Constraints

下面的數字輸入20 左方與右方的數字輸入10
會變成紅色
要注意現在紅色的 類似工 這個字的紅色是虛線
一定要變成紅色實線才代表有點到
此時後再按Add 3 Constraint 就完成了
接著按下標籤後
再去點選最右邊的這個圖示
然後點選update frames即可更新畫面
重複做三次以後
接著排板完成以後開始寫程式碼
先進行IBOUTLET 點擊Slider
以後按著滑鼠右鍵
拖曳到ViewController.m裡面寫程式碼
@interface ViewController ()下方出現這個游標
在name裡面輸入redSlider
然後陸續做三次分別在命名greenSlider , blueSlider

接著
將Label也拖曳進去
最後程式碼變成
interface ViewController ()
@property (weak, nonatomic) IBOutlet UISlider *red;
@property (weak, nonatomic) IBOutlet UISlider *blue;
@property (weak, nonatomic) IBOutlet UISlider *green;
@property (weak, nonatomic) IBOutlet UILabel *redLabel;
@property (weak, nonatomic) IBOutlet UILabel *blueLabel;
@property (weak, nonatomic) IBOutlet UILabel *greenLabel;
然後將第一個SLider拖曳到@implementation ViewController下方
進行IBAction

然後第二個與第三格拖曳進這個IBACTION裡面如下圖
裡面的程式碼可以暫時忽略(你在執行這個動作的時候是看不到的)
然後將第一個SLider拖曳到@implementation ViewController下方
進行IBAction

然後第二個與第三格拖曳進這個IBACTION裡面如下圖
裡面的程式碼可以暫時忽略(你在執行這個動作的時候是看不到的)

完成以後開始寫內部的動作
float red=self.red.value;
float blue=self.blue.value;
float green=self.green.value;
//以上這些宣告都是在將值儲存
_redLabel.text=[NSString stringWithFormat:@"Red:%.0f",red];
_blueLabel.text=[NSString stringWithFormat:@"Blue:%.0f",blue];
_greenLabel.text=[NSString stringWithFormat:@"Green:%.0f",green];
//這裡的標準格式是IBoutlet的變數名稱.text=[NSString stringWithFormat:@"佔位符號",上面float宣告的變數];將值轉換成文字的形式顯示出來
UIColor * color = [UIColor colorWithRed:red/255.0 green:green/255.0 blue:blue/255.0 alpha:1];
//呼叫UICOLOR的方法
self.view.backgroundColor=color;
//改變背景顏色的方法
完成以後就可以按下輸出了
特別備註:要更改IBOUTLET裡面的label變數不可以直接改
要先點擊右方 click1然後再按click2取消這個Label與controller的關係
然後再重新拉一次才會鍵結view與controller的關係。

Comments
Post a Comment